8-Steps to How to Start A Blog From Scratch?
#1: Choose the Right Niche for Your Blog
Did you know? 99% of bloggers leave their blogging career in the initial six months because of the selected niche. After a certain period, they don’t find their niche interesting anymore.
Thus, choosing a niche with a complete vision for the next 5-10 years is essential. So that you will sustain it and never get a lack of data or interest, you can take the example of smart passive income or shout me loud like niches; they have selected the niches they could sustain with and make profitable in the future. Therefore, you can see their position in the blogging industry now.
We won’t recommend you to choose the same niche as smart passive income or shout me loud; instead, you should be looking for the niche that would be the best fit for you.
Then, How can you find your be-fitting niche?
There is a straightforward fail-proof method to select your niche that will prosper you in the future.
You have to focus only on two things: 1) Your Passion and 2) Profitability.

- Passion: Figure out your interest area or the place where you have excellent knowledge. This will help you to research that topic and deliver exceptional content interestingly.
Thus, sit with a pen and paper and write down all the niche triggers you have, along with the pros and cons if you select them. Now, you will probably be left with 2-3 niches at maximum, or if you are left only with a single niche, then congrats, you have your answer.
- Profitability: Now, if you’re confused between 2-3 niches, you should research how much money you can make from that niche. How many affiliate programs can you use? Is the niche filled with good keyword volume?
Therefore, when you are finally ready with your blogging niche, let’s move on to the next essential step…
#2 Select Your Blogging Platform
Without wasting any of your time, we recommend you go for the WordPress Blog because it is one of the best and most versatile online blogging platforms.
WordPress Blog will give you complete freedom to build your blog as your own since it comes with rich customizable options. You will get many options regarding the themes and plugins that will give you an excellent blog.
Moreover, 35% of the websites are built upon WordPress worldwide.
#3: Register A Domain Name and Choose Reliable Web Hosting Provider
Domain Name and Web hosting are essential to creating a blog, as the users would search your domain name to locate your website, and web hosting would be where your entire website would be. Thus, you have to select both of them very carefully.
Let’s start with the domain name first !!
Domain Name: Domain Name is the name of the website that everyone searches for to find your blog on google.
We would recommend four tips that will help you get the right domain for your blog:
- Keep the domain short & simple.
Domain names should be short and straightforward so that everyone can pronounce them and remember them easily. If you go for the long names, you will end up wasting money on a worthless domain.
- Apply Keywords to it
Adding primary keywords in the domain name will help your website in SEO.
- Avoid the use of numbers.
Please avoid using the numbers in your domain, as it looks peculiar, and it is scientifically proven that no one can remember the number easily.
- Always apply for the TDL Extensions.
It would help if you always went for the extensions like .com because, first of all, it is a global extension, and secondly, it will provide you with several benefits in the long term.
You can either buy the domain from anywhere you get a reasonable price or purchase it from the web hosting provider you choose. You can also get a domain for free with your web hosting in many of their plans.
Step-by-step methods to purchase the domain name
We’re taking the example of hosting. You don’t need to worry, as all the domain selling platforms have a similar method.
Step 1 – Find a Domain Checker
Firstly, You have to search whether the domain name you have selected is available or not. Hosting allows you to quickly check the global availability of the domain name you’re searching for.

Suppose you find your desired domain already taken. In that case, you try different extensions (i.e., .xyz, .net, .org), try a more extended version of your domain name by adding “the”, “my”, “a” etc., or you can also contact the owner of the domain if he is interested in buying the domain name.
Step 2 – Run a Domain Search
Once you click on the “Search” button, you will get all the available options. You can select any domain name, and if you are looking for any specific domain name, you cañ also use the “domain extension filter.”

Step 3 – Select Your Domain
Once you figure out the domain name you’re looking for, you can proceed to “Add to Cart.”

Once you have met all the requirements, you can proceed with the payment mode.

Step 4 – Complete The Registration Process
When you’re done with payments, you will automatically be redirected to cPanel. After that, you have to set up your domain name.

To set up the domain, you must fill in the essential details, as your filled information will be officially stored in the WHOIS domain database.

Step 5 – Verify Your Ownership
At last, you should check the email you have received within one or two minutes. If you don’t receive any email, you can resend it through the cPanel. It would help if you verified the confirmation instantly. Otherwise, you might face a temporary suspension.
Web Hosting: All of your data blog-related data will be stored on web hosting. Web hosting is what shows your website live on the internet.
As if you’re a beginner; thus it would help if you choose beginner-friendly web hosting, and we would highly recommend the following:
- Hostinger
- Cloudways
We are also using Cloudways, and both the hostings are quick, responsive, reliable, and consist of excellent features offerings in their plans.
Let’s take an example of how to purchase web hosting from Hostinger.
Step 1 – Pick the Relevant Hosting Plan
When you decide to purchase the hosting from the Hostinger, you have to go through their typical hosting plans, where you have to select the hosting based upon your current requirements.

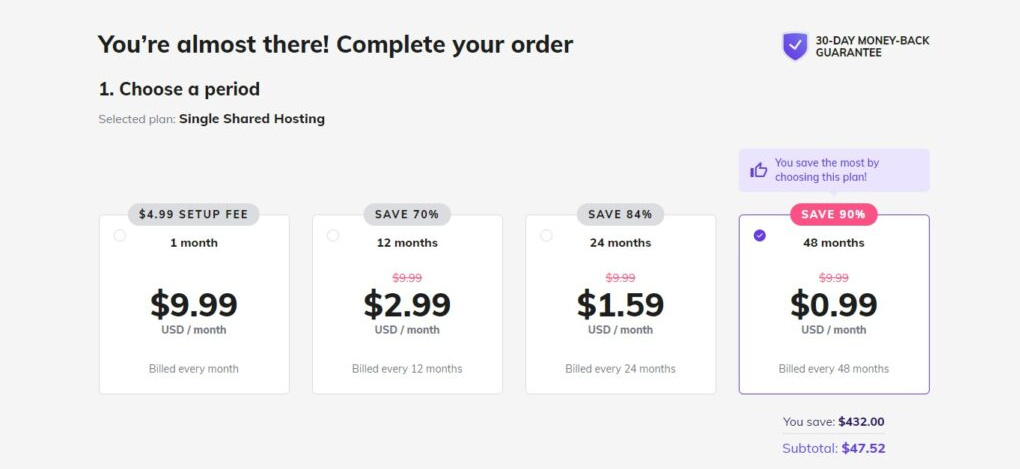
Step 2 – Pricing Details
Once you have decided on the hosting plan, you will be automatically redirected to the checkout page. Here you will get your order summary.
Step 3 – Account Creation or Login
When you’ve selected almost everything, Hostinger will ask you for the “Account Creation” with the help of your Email, Facebook, Google or GitHub. If you already have an account, then login will be easier.

Step 4 – Select Payment Methods
Now, you have to choose the payment option from several options such as Debit Card, Credit Card, PayPal, Cryptocurrency etc.

After selecting your payment details, you have to enter the “payment details” and then proceed with pressing the “Submit Secure Payment.” You will see your order summary, and then you can press the “Pay Now.”
Now, it’s time to set up your WordPress blog !!
Step #4: Set Up Your WordPress Blog
Setting up WordPress with Hostinger is a few clicks game. We will help you to install WordPress through the Auto-installer in 2-simple steps:
Step 1 – Firstly, open your Hostinger’s hPanel, and search for the hosting account there. Enter your username and password, and then you will get such interface in your display as below:
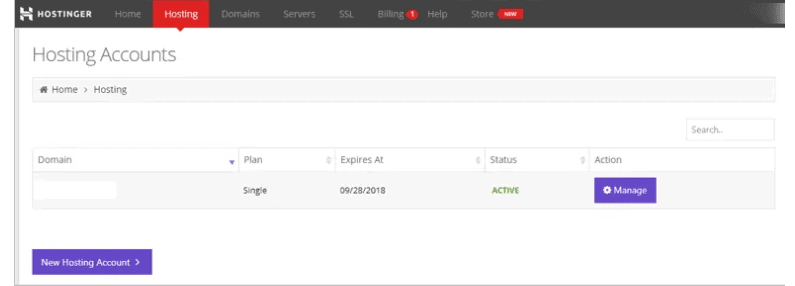
Step 2 – You need to locate the “Manage” button. On that page, you will also see your hosting details and settings. Click on the button, and you will automatically be redirected to a page as shown below:

On this page, you will have all the necessary settings to help you manage your website’s essentials. The best part is that everything will be presented in separate sections.
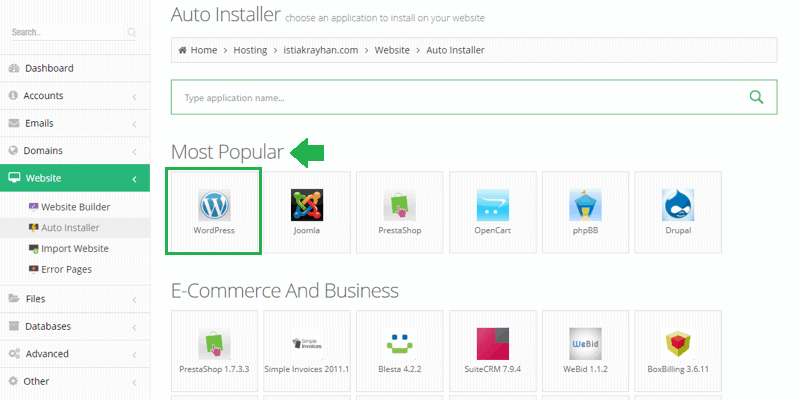
To install WordPress, you have to browse for the “Website Section” and click on the “Auto Installer.”

Once you click on it, it will redirect you to the Auto-Installer web page, and you will use the WordPress icon there. Thus, you can directly install WordPress on your server. So click on it.
After this, you must fill in your domain name and press the “Next” button. It would be better to install the SSL before installing WordPress. If you’re confused about installing it, you can take the direct help of the service team.

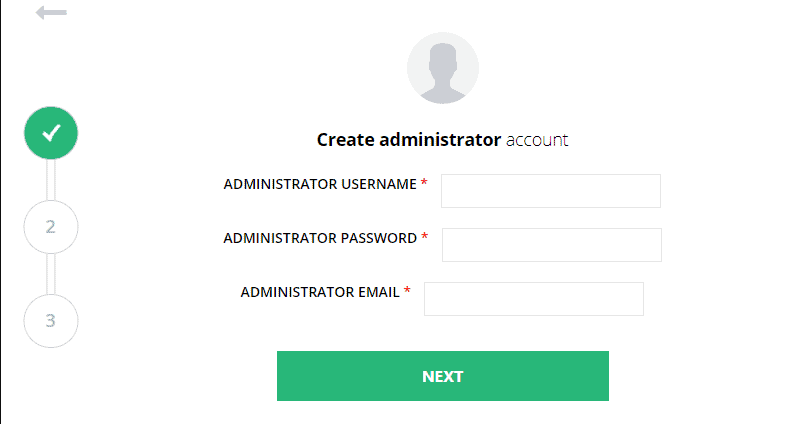
Now, you are required to set up the username and password of your WordPress dashboard through your email address. Click on the next button, then.
You must complete the three-step process to install WordPress on your server successfully. After completing all these three steps, you will receive your WordPress login link in your email.
Clicking on the link will directly take you to your WordPress dashboard. Thus, finally, you got your WordPress installed.
Step #5: Choose An Attention Grabbing Theme
Now, when you are done with installing WordPress, let’s come to the point of how your website/blog would look.
Most of the visitors are highly attracted by the looks of the website, and it also increases the trust factor. Good design will also give you confidence that you have a unique blog, and people will love it.
In WordPress, you get many free and nulled themes, especially for a blogger. But, we won’t recommend you to use it. Thus, they are easy to hack, and you might be losing your data all of a sudden. So, make an investment in your blogging journey and purchase a good theme and plugins.
What could be the best fitting theme for you if you’re also wondering? Then, we have hand-picked some of the best themes in this section that would be light in weight, quick to load, easy to use, highly responsive, and have excellent contact support.
- Generate Press: Generate Press is generally known as the lightest theme over WordPress. It is a stunning theme that gives your website attractive looks and is highly customizable; even newbies can edit it. It also offers excellent customer support.
- Astra Pro: Astra Pro is even better than the Generate Press, as they offer many additional features. It is also a lightweight theme and can easily be customized. Utilizing customizing elementor can help make your homepage and other pages far more attractive.
Follow these simple steps to Install the theme in your WordPress:
Before installing the theme in your WordPress, you must log in to your Dashboard> appearance > themes.
- You can browse several themes in the themes section if you’ve already selected your theme. Press the “Add New” button.

- Now, you must press the “Upload Theme” to upload the theme zip and activate the theme into your blog.

Now, you have finally installed your theme in WordPress. Installing the theme is easy, but the challenge is customizing the theme.
To initiate the customization, click on Appearance > Customizer. Then, you will be shifted to the customized area of your theme. Once you customize your theme according to your needs and requirements, it will become responsive and optimized.
Thus, once you have your themes installed and customized, it is essential to take you to install some plugins that will help you automate your website.
Step #6: Have A Look At These Essential Plugins
WordPress is known for its plugin compatibility. You can also install the plugins in your blog to optimize your content, boost SEO, increase the loading speed and responsiveness of the website, and much more.
There are thousands of plugins available in WordPress. Thus, we have mentioned some of the top-notch plugins so that you can select the relevant plugins for your blog.
#1 Elementor
Elementor is a page builder which allows you to build your dream landing page via drag and drop feature. It is very lightweight for the website and helps create a stunning page.
#2 Thrive Leads
Thrive Leads helps website owners gather visitors’ emails via popup lightbox, sticky ribbon, screen filler overlay, content lock, and many other things.
#3 WP Rocket
WP Rocket is a plugin that will optimize your entire website and increase speed. Thus, if you also want to increase the speed of your website, you should go for the wp rocket plugin.
#4 Rank Math SEO
SEO is one of the essential parts of driving traffic to your site. Rank Math is one of the most prominent plugins of WordPress that boost the ranking of the website. It is even one of the favorite plugins of bloggers these days.
#5 Anti Spam
Blogging websites often face spam comments in their comments section, negatively impacting genuine visitors. Thus, the Anti Spam plugin will help you automatically remove spam comments.
#6 iThemes Security
Blogging websites are several times tried to be hacked. Thus, iTheme Security will help you to keep your website safe and secure.
#7 Social Snap Pro
Social Snap Pro plugin is one of the on-demand plugins, as it will help you drive traffic from social sites such as Facebook, Twitter, and almost every platform.
#8 UpdraftPlus
UpdraftPlus takes the daily backup of the website, which will help you to live and work tension free. You can also restore the data whenever you want.
Likewise, the themes, you should not use cracked or nulled themes. Otherwise, you might lose all of your data suddenly. Thus, treat your blog entirely as a business and make necessary investments.
4-Simple Steps to Install Plugins:
- Open your WordPress dashboard.
- Click on the Plugins > Add New.
- Upload the zip file of your plugin and press the “Install Now” button
- Once the plugin is installed, press the “activate button”, and the plugin will be activated.
Step #7: Write Your Engaging Blog Posts
To start writing and publishing your blog post, visit your Dashboard> Post > Add New.
Now, you will get to the interface where you can start writing your blog post.

We have mentioned some of the best tips for you to write a stunning blog post:
- Firstly, I recommend you start with keyword research to understand the topic better. We will also recommend you go with the long-tail keywords, as they are much easier to rank.
- It would help if you tried to create an eye-catching title for your blog by including factual numbers and strong words.
- Adding images to your blog post will make it more reliable, and more people will surely open your blog post.
- You can keep your article lengthy and filled with every minute detail, as it will show that you have worked hard for the article, and so many people will get their genuine answers.
- Try to create more one-to-one conversations so your blog posts will become more engaging.
Step #8: Some Practical Ways To Make Money Blogging
If you’re also dubious, how will you earn money through your blog post?
Then, you need not worry, as we have mentioned some of the best ways to earn make money through your blog posts:
- Affiliate Marketing: In affiliate marketing, you promote the other’s products, and for each sale, you get a considerable commission.
- Advertising on Blog: One of the common ways to make money through it is to monetize your blog and earn through the traffic and ads.
- Two Leading Websites: You can use the programs of Adsense and Media.net to make money.
- Offering Service: If you know any skill (for example, SEO), then you can also after that in your blog posts, and the needy ones will directly pay you the money. It is one of the top-notch or most straightforward ways to earn money.
- You Can Sell Your Course or Product: After a certain period of time, when your audience trusts you, you can create your course and start selling it at a reasonable price. You will surely earn a significant amount of money through it. It is one of the intelligent ways to earn money in the blogging market.
All these are ways to make money through your blog. You need to keep one thing in mind: it is a patience game. You will gradually develop your audience, and then you will start earning money.
Final Words
This is the step-by-step method of how to start a blogging business and make money through it. We have mentioned several minute details that will help you in the long and short term.
We hope you like the article i.e. How to Start A Blog from Scratch in 2023 and get to know all the required information through it. Thanks for reading the article.